


Spring has sprung and the change of seasons calls for more than the traditional spring cleaning. These tips and tricks from Wisco Flip, an RV renovation company, will have you ready to take on a spring refresh for your rig so you can camp in HGTV-worthy style this summer.
For the love of (faux) shiplap.
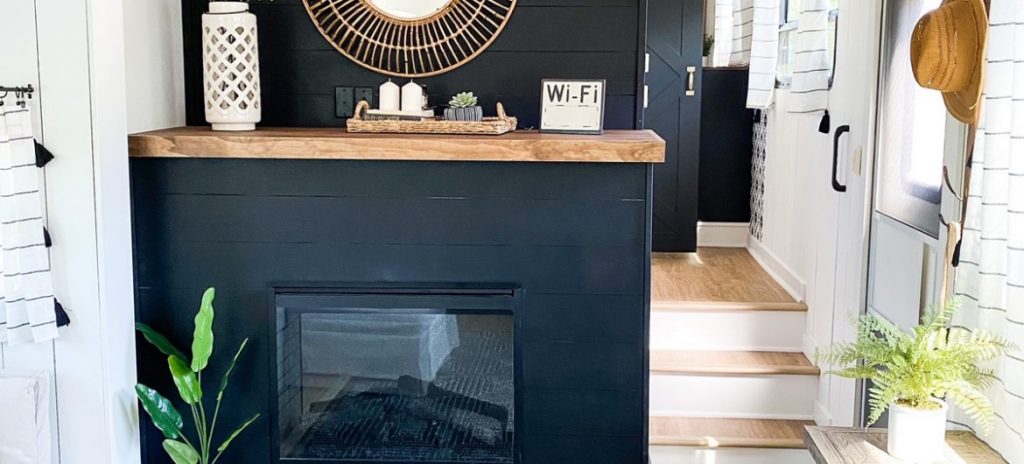
Probably the most popular topic other than paint (which we’ll cover shortly) is faux shiplap. People want to know how and why we do it. First and foremost, if you’ve ever renovated an RV and taken down the old valances, then you’re very aware that the manufacturers screw all of those into the walls themselves. When those are removed, the walls can be in pretty rough shape, even when taking your time to do it. Shiplap (brought to us and made super popular by Joanna and Chip Gaines of “Fixer Upper” fame) is a great way to cover the existing wall structure and make it aesthetically pleasing. Most people prefer white shiplap. I’m going to walk you through some easy steps to create faux shiplap for your rig. It’s perfect for an RV because of the light weight and side note, there’s no need to remove the manufacturer’s wallpaper that currently exists. You can go right over it!


We rip down sheets of 1/4 inch plywood veneer (also known as utility board) that comes in 4ft x 8ft sheets and can be purchased at any big box home improvement store. We rip them with a table saw to 6” widths. Once all of your shiplap is cut and then measured to size, you can begin installing. We use a glue substance called mastic and apply it to the back of the shiplap with a plastic putty knife. You can also use Heavy Duty Liquid Nails Construction adhesive. We’ve used both but prefer the mastic because it’s less messy. Once the mastic is applied, we simply adhere it to the wall and use pin nails (nail gun required) to hold them in place (the glue does most of the work). We’ve found the easiest way to space out the shiplap is to use pennies or quarters to space in between each board. After your shiplap is applied, some folks like to leave the nail holes for character and some choose to spackle over them. If you choose to spackle them, a little goes a long way so spackle sparingly. Let dry and sand lightly with 220 grit. You’ll need to apply a light coat of paint over the spackled areas but then your project is complete. You’ll sit back and be super proud of yourself along with loving the fresh, new look of your RV.
Let’s talk about paint colors.
It’s no secret that the timeless trend for the last few years in RV renovation has been white cabinets. We’ve done them ourselves many times. Some think that white is impractical but it’s really all about prepping and personal preference so I wouldn’t stress too much on that one. If you’ve always wanted white, do white! We’ll share some very common colors at the end of this section.


We’ve also seen green come on the scene over the last year as a choice for RV cabinetry in various shades. Green is associated with nature and the outdoors so that makes sense, and acts as a way to bring the outdoors in. It can also be a gorgeous contrast if you have white walls. Black is also used as an accent color that really pops against white walls. We did a black fireplace for our very first renovation and loved it! Navy blue is also one of those trends you won’t have to worry about. It’s a timeless color that has always been favored by interior designers. Using it as a cabinet shade ensures that your kitchen or bathroom cabinets will go the distance over time. One color that might surprise you that is most certainly on its way out is grey. Yes, you heard that right, grey is out and color is finally in. At the end of the day, it really is personal preference and what you like because after all, it’s your rig! Below are some of our favorite color choices for walls (whites and greiges) and cabinet colors, too. It’s important to note, whatever color you choose we highly recommend a sheen of satin for walls and semi-gloss for cabinets for ease of cleaning.


The hardest part: Paint prep and painting.
Paint prep and paint choices are by far the two hardest but most rewarding things you’ll do to reimagine your RV space on a budget. We always say a can of paint can go a long way but only if you put the work in and prep the right way. Be sure to make any repairs beforehand, and then clean all surfaces with a degreaser such as TSP. This will not take the place of any prep sanding that needs to occur before you prime. We see a lot of comments on several RV forums from people who didn’t sand before they painted. We think that’s the biggest mistake you can make if you want the paint to last for a long time without peeling or cracking under any extreme weather conditions (hot or cold).
Once you’ve cleaned the surfaces well, you’ll need to scuff sand all of your cabinet surfaces. On the upside, the RV walls do not need to be sanded. Since they are typically slightly textured, the primer takes right to the walls without issue unless you try to paint in temperatures below 65 degrees. We had another renovator reach out to us when they tried to paint the RV walls in the winter. They had space heaters on which warmed up the temperature on the inside, but the metal frame was still cold and the paint did not stick to the walls in those metal areas. The space heaters also add humidity to the area and when you add in wet paint on top of it, you can have a runny mess on your hands and you have to repeat the job again.


After scuff sanding all parts of any wood or faux wood surface that you want to paint, you’ll need to wipe down again with TSP after sanding is complete to clean the surface. Let the surface dry completely. All surfaces including walls will need to be primed with a bonding primer. We’ve tested several different brands out and our two favorites are Zinsser B-I-N Shellac based white interior primer and Sherwin Williams Extreme Bond Primer. Since Sherwin Williams has recently had a shortage on all paints and primers, we mostly default to the Zinsser B-I-N. This is an oil-based primer and does have high fumes so it’s important to wear a respirator while painting, especially if you’re trying to spray the whole rig at one time (if you’re rolling the paint, you’re likely not painting the whole rig the same day so the fumes are much less). This primer dries very fast, so we can typically do two coats in one day and then let it dry overnight. The next day we go through and inspect to see if there are any runs, and ensure we sand them just enough to take out any texture before we apply the first coat of paint. If you walk through and there is any bubbling on the wood surfaces, that means the surface was too smooth and you didn’t sand enough or just missed that spot but don’t worry, you can hand paint those spots with primer again.


The real painting can finally begin…well, maybe. You’ll want to walk through your rig to see if you need to sand any raised or rough spots on the walls or cabinets. Sometimes, especially if it’s real wood, the wood grain raises during the primer phase so you’ll need to sand with a very light 320 grit. You’ll sand just enough to make smooth. Wipe down again with TSP and then you can start painting. In all 11 of our renovations, we’ve always used the Sherwin Williams Emerald line for RV cabinets and the Duration line for walls. The Emerald line is a varathane paint that hardens and self levels. It’s exceptional and so far, we’ve gotten no complaints! We recommend breaking up painting over at least 2-3 days and we always do 2 coats of paint on all surfaces. This is the same for all cabinet doors, which should be removed during painting.
For all cabinet doors and drawers, we spray everything because the finish is nice. You can hang your doors or you can lay them flat to let dry but if you lay them flat, you’ll need to make sure they are nice and dry before flipping or you could create an issue of your doors sticking and removing some of the paint when you lift them up to flip them. Paint takes several days to fully cure so it’s important to remember that and allow the cabinets to dry thoroughly. We actually wait 3 days before we apply the second coat. Once your second coat is on, give it some time before you fully use your cabinets. For reference, paint isn’t typically fully cured for about 30 days on cabinet surfaces but can be handled within 1-2 weeks on a daily basis.”